Codex Subagents: How to Set Them Up and Use Them
Short answer
Short answer: Codex subagents are extra agents that Codex spawns in parallel for focused jobs, such as exploring code, running tests or reviewing a branch, and then collects their results into one answer. They are on by default in current Codex releases. Ask for them in plain words, then use /subagents to inspect their threads. To make your own, add a TOML file with name, description and developer_instructions under .codex/agents/ for a project or ~/.codex/agents/ for personal use.

A developer reviewing a pull request may ask Codex one long question and get one long answer that mixes security, tests and maintainability. Subagents split those concerns into focused threads, while the main thread keeps the requirements and combines the findings.
Before you start
You need Codex CLI and a repository to work in. By the end, you will have a custom agent file Codex can use and a way to watch its thread.
What Codex subagents are
OpenAI describes subagents as specialized agents that run in parallel and return their results to one response. The main agent stays focused on requirements, decisions and the final answer, while subagents handle exploration, tests, triage or log analysis and return summaries.
“ChatGPT Work and Codex can run subagent workflows by spawning specialized agents in parallel and then collecting their results in one response.”Source: OpenAI, Subagents, read 4 November 2026.
Current Codex releases enable subagent workflows by default. They are most useful when the work divides cleanly, especially for read-heavy exploration, test review, triage and summarization. Parallel write-heavy work needs more care because agents editing at the same time can create conflicts and coordination work. Each subagent also does its own model and tool work, so a multi-agent run uses more tokens than a comparable single-agent run.
Codex includes a general-purpose default agent, an execution-focused worker and a read-heavy explorer. You can also define a custom agent with a narrower job.
Ask Codex to use subagents
In an interactive CLI session, ask Codex directly to split the work. OpenAI gives examples such as “spawn two agents”, “delegate this work in parallel” and “use one agent per point”. A useful prompt says how to divide the work, whether Codex should wait for every result and what the combined answer should contain.
OpenAI's example prompt is:
Review this branch with parallel subagents. Spawn one subagent for security risks, one for test gaps, and one for maintainability. Wait for all three, then summarize the findings by category with file references.Codex handles the orchestration: it starts the agents, sends follow-up instructions, waits for results and closes threads. When all requested results are ready, it returns one consolidated response.
One focused agent per question is like asking each AI engine what it says about your product. Xtrusio's free AI visibility check shows when ChatGPT and Gemini mention you, which competitors appear instead and what to work on next.
Use subagents: Steps 1 to 5
Ask Codex to spawn agents, type /subagents, pick a thread, steer or stop it by asking, then read the combined answer.
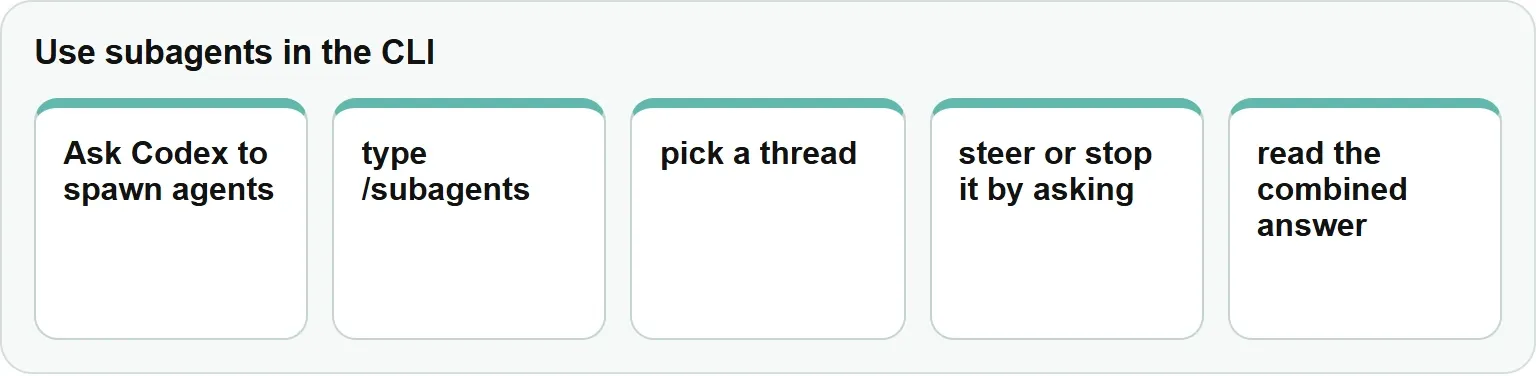
Step 1: Ask Codex to split the work
Describe the separate jobs, ask Codex to wait for all agents and name the summary you want.
You should see: Codex open focused agent threads for the requested jobs.
In our example: the jobs cover security, test gaps and maintainability.
Step 2: Open the thread picker
Type /subagents and press Enter.
You should see: a picker listing the agent threads in the current run.
In our example: the picker separates each review job from the main thread.
Step 3: Pick a thread
Select the thread you want to inspect. Codex switches the active thread so you can read or continue that agent's work.
You should see: the chosen agent's current context and output.
In our example: select the test-gap thread to inspect its file references.
Step 4: Steer or stop the agent
Ask Codex to send a follow-up instruction, stop a running subagent or close a completed thread. In an interactive session, an approval request from an inactive thread can appear with its source label; press o to open that thread before answering.
You should see: the selected thread respond to the new direction or stop.
In our example: ask the reviewer to keep only findings with a file reference.
Step 5: Read the combined answer
Return to the main thread and let Codex wait for every requested result.
You should see: one consolidated answer organized around the output you requested.
In our example: the final response groups findings by security, tests and maintainability.
Make your own agent: Steps 1 to 4
A standalone TOML file defines one custom agent. Follow these steps for a project-scoped pull-request reviewer.
Scope | Folder | Use |
|---|---|---|
Personal | | Agents available across your projects |
Project | | Agents stored with one repository |
Source: OpenAI, Subagents, read 4 November 2026.
Step 1: Create the project folder
Create .codex/agents/ in the repository.
You should see: the new agents folder inside the project's .codex directory.
Our example (illustrative): the pr_reviewer agent reviews one branch and returns findings with file references.
Step 2: Save the agent file
Save .codex/agents/pr_reviewer.toml with name, description and developer_instructions.
name = "pr_reviewer"
description = "Review a pull request for concrete correctness, security, and test risks."
developer_instructions = """
Read the changed code and its tests.
Do not edit files.
Return only concrete findings with file references.
Group findings by correctness, security, and missing tests.
"""
You should see: a TOML file with the agent identity, when Codex should use it and how the reviewer should work.
Step 3: Call the custom agent
In a Codex CLI session, run this prompt:
Use pr_reviewer to review this branch against main. Wait for its result, then summarize the concrete risks with file references.You should see: Codex delegate the branch review to the named custom agent.
Step 4: Confirm the thread
Type /subagents and open the pr_reviewer thread.
You should see: a pr_reviewer thread that returns findings with file references.
Every file needs name, description and developer_instructions. The name field is the agent's identity; matching the filename is a useful convention, but the field is the source of truth. The description tells Codex when the agent fits, while the developer instructions define its behavior.
If the file sets model or model_reasoning_effort, that value takes precedence. Otherwise the agent inherits the parent agent's model and reasoning effort. A custom name that matches a built-in agent, such as explorer, takes precedence over the built-in version. Keep each custom agent narrow, with one clear job.
OpenAI also publishes this reviewer agent:
name = "reviewer"
description = "PR reviewer focused on correctness, security, and missing tests."
model = "gpt-6.1-sol"
model_reasoning_effort = "medium"
developer_instructions = """
Review code like an owner.
Do not edit files.
Prioritize correctness, security, behavior regressions, and missing test coverage.
Lead with concrete findings, include reproduction steps when possible, and avoid style-only comments unless they hide a real bug.
"""
The related OpenAI prompt names each agent:
Review this branch against main. Have pr_explorer map the affected code paths, reviewer find real risks, and docs_researcher verify the framework APIs that the patch relies on.What an agent inherits, and what it cannot change
A custom file can tune the agent's job, but the parent session still controls its security boundary and shared services.
Area | What the custom agent can do | What comes from the parent |
|---|---|---|
Model | Set | Inherited when those fields are absent |
Instructions | Set | The parent's task and applicable instructions still frame the work |
Skills and features | Disable individual skills with | Skills otherwise inherit from the parent |
Sandbox and approvals | Instructions may ask the agent to avoid edits | Current sandbox and approval settings, including changes made with |
Provider and tools | Use services available to the parent | |
Source: OpenAI, Subagents, read 4 November 2026.
An instruction such as “Do not edit files” guides behavior, but does not create a separate read-only sandbox. Settings such as sandbox_mode, approval_policy, model_provider and mcp_servers do not replace the parent configuration when put in a custom agent file. Configure MCP servers in the parent session. In non-interactive work, an action that needs a new approval fails when the run cannot surface that approval, and the error returns to the parent workflow.
Limit how many agents run
Use the [agents] section in project or user configuration to cap concurrent spawned threads. The primary thread does not count toward this cap.
[agents]
max_concurrent_threads_per_session = 8
If agents.max_concurrent_threads_per_session is unset, Codex chooses the default. Existing configurations can keep agents.max_threads as a legacy alias. agents.default_subagent_model and agents.default_subagent_reasoning_effort set defaults for spawned agents, but explicit values supplied when an agent is spawned take precedence. agents.enabled defaults to true; set it to false to disable multi-agent tools.
For a wider tour of settings, see the Codex CLI configuration guide. If you are new to the terminal workflow, start with how to use Codex CLI and the Codex CLI command list.
If Codex does not use or cannot find your subagent
Start with the request, then check the multi-agent switch, the agent file and the approval path.
- Ask directly. Tell Codex to spawn agents or delegate the named jobs in parallel.
- Check the switch. Confirm
agents.enabledis not set tofalse. - Check the file. Make sure the TOML file has
name,descriptionanddeveloper_instructions, and call the value inname. - The agent never appears. Check that the
namevalue is what you called, the file is in.codex/agents/or~/.codex/agents/, andname,descriptionanddeveloper_instructionsare present; then, (our suggestion), start a new Codex session after saving the file. - Check approvals. In a non-interactive run, move an approval-dependent action to a flow that can surface the request.
For another product's delegation model, read our guide to Claude Code subagents. Repository-level instructions can also shape delegation; see AGENTS.md.
Get your free AI visibility check
See when engines mention you and what to improve with Xtrusio's free AI visibility check.
Sources
OpenAI and Xtrusio pages read 4 November 2026.
- Subagents , OpenAI
- Developer commands , OpenAI
- Configuration reference , OpenAI
- Xtrusio home page , Xtrusio
Frequently asked questions
Are Codex subagents on by default?
Yes. OpenAI says current Codex releases enable subagent workflows by default.
Where do I put a custom Codex agent?
Use ~/.codex/agents/ for a personal agent or .codex/agents/ for a project-scoped agent.
Do subagents cost more tokens?
They use more tokens than a comparable single-agent run because each subagent does its own model and tool work.
Can a custom agent have its own sandbox?
No. It inherits the parent turn's sandbox and approval settings; instructions to avoid edits do not create a separate read-only sandbox.
How do I stop a Codex subagent?
Ask Codex directly to stop the running subagent or close its completed thread.
Topics
- codex subagents

Xtrusio
AI visibility research
Xtrusio is the Perception Engine for B2B brands.
Free check
See how AI engines answer about you
Get your free AI visibility check
Keep reading
 Technical SEO · Nov 4, 2026 · 6 min read
Codex Skills: What They Are and How to Make Your Own
Learn what Codex skills are, where Codex finds them, and how to create, call, share, disable and troubleshoot your own skill. Technical SEO · Nov 4, 2026 · 6 min read
Claude Code GitHub Actions: Set Up @claude in Your Repo
Set up Claude Code GitHub Actions with /install-github-app or a manual workflow, then test @claude, control costs and fix common failures. Technical SEO · Nov 4, 2026 · 7 min read