Codex Skills: What They Are and How to Make Your Own
Short answer
Codex skills are folders that package a repeatable workflow. Each skill has a SKILL.md file with a name, a description and instructions, plus optional scripts, references and assets. Codex sees the name and description first, then loads the full instructions when it uses the skill. To make one, run $skill-creator, or create the folder yourself in .agents/skills or $HOME/.agents/skills. Call it with $ or choose it through /skills.

A developer may paste the same release-notes checklist into Codex before every release. The same reminders about format and exclusions appear each time. A skill turns that checklist into a reusable command.
Before you start
You need Codex CLI or the IDE extension, plus 1 workflow you repeat. At the end, you will have a skill folder Codex can find and a $ command that runs it.
What a Codex skill is
A skill is a directory with a required SKILL.md file. The file must contain a name and description. The directory can also hold scripts, references and assets. An optional agents/openai.yaml file adds interface details, invocation policy and tool dependencies.
OpenAI says standalone skills work in the ChatGPT desktop app, Codex CLI and the IDE extension. They follow the open agent skills standard. If you use another product, read our separate guide to Claude skills.
A skill packages instructions, resources, and optional scripts so either product can follow a workflow reliably.
Official wording: OpenAI, Skills page, read 4 November 2026, learn.chatgpt.com
A small skill may contain only the required file. A larger one can keep long material in references/, repeatable commands in scripts/ and supporting files in assets/.
release-notes/
  SKILL.md
  references/
    release-format.md
  assets/
    release-template.md
How Codex picks and loads a skill
Codex uses progressive disclosure. Its initial list contains each skill's name, description and file path. When a request matches the description, Codex loads the full SKILL.md. It opens other files only when the instructions need them.
You can invoke a skill explicitly by typing $ or opening /skills. Codex can also choose one implicitly when your task matches its description. That makes the description the routing line, not a short label to write at the end.
The initial list uses at most 2% of the model's context window by default, or 8,000 characters when the window is unknown. You can change the budget with skills.max_context_tokens, up to 10,000 tokens.
A skill's description helps Codex decide when to use it. AI search systems make a similar choice from the pages they find: whether to name your company and which URL to cite. Xtrusio plans content from the searches those systems run, then counts a piece only when an engine cites that exact URL.
Make your own Codex skill, step by step
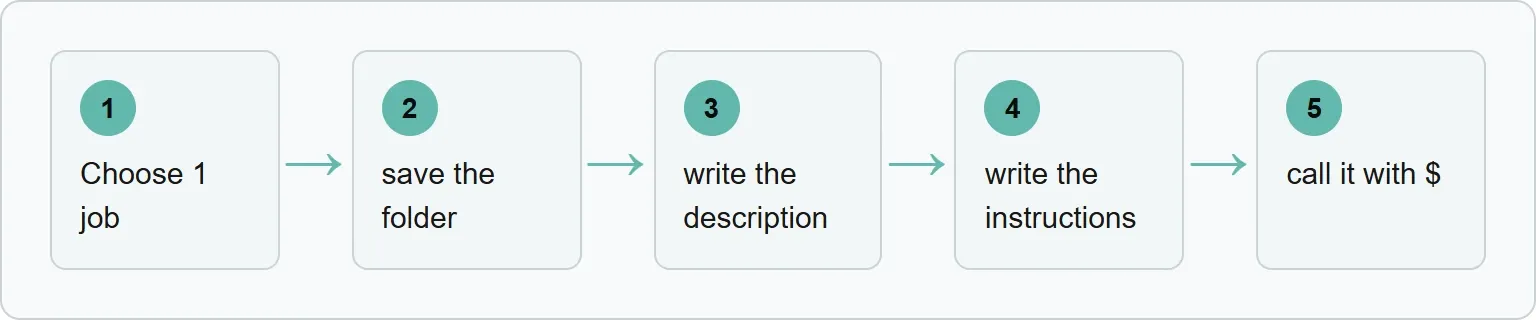
Choose 1 job, create and save the folder, write the description, write the instructions, then call the skill and inspect the result.
Step 1: Choose 1 job
Pick a workflow you repeat and give the skill 1 clear outcome. OpenAI recommends keeping each skill focused on 1 job.
You should see: a short sentence that says what the skill will produce.
In our example: the skill turns merged changes into release notes.
Step 2: Create and save the folder
Create .agents/skills/release-notes/ in the repository, or use $HOME/.agents/skills/release-notes/ when you want the skill available across repositories. Add a SKILL.md file inside it. You can also run $skill-creator in Codex and answer its questions.
You should see: a skill folder with a SKILL.md file.
The complete illustrative SKILL.md appears in the release-notes example below.
In our example: the repository folder shares the release workflow with the team.
Step 3: Write the description
Put the main use case and trigger words first. Keep the scope clear enough that Codex can tell when the skill applies.
You should see: a description that names the task, input and moment to use it.
In our example: release notes, merged changes and a version label are the key terms.
Step 4: Write the instructions
Use imperative steps with explicit inputs and outputs. Prefer instructions to scripts unless you need deterministic behavior or an outside tool.
You should see: a sequence Codex can follow without guessing what to read or return.
In our example: Codex reads the change list and returns a Markdown release note.
Step 5: Call the skill and inspect the result
Type $ to mention the skill or open /skills. Give it the input named in your instructions. If a recent change does not appear, restart Codex.
You should see: Codex load the skill and return the output you requested.
In our example: the call includes the version label and the merged changes.
Our example: a release-notes skill
Our example (illustrative): this original skill turns a supplied list of merged changes into release notes. It does not describe a recorded run.
The folder contains:
.agents/skills/release-notes/
  SKILL.md
  references/
    release-format.md
The full SKILL.md is:
---
name: release-notes
description: Create release notes from merged changes and a version label. Use when the user asks to draft, prepare or format release notes for a software release.
---

# Release notes

1. Read the supplied version label and merged changes.
2. Group the changes into Added, Changed and Fixed.
3. Describe each change in plain language for a product user.
4. Omit internal ticket numbers and implementation details.
5. Follow references/release-format.md.
6. Return one Markdown document with the version label as its heading.
The full illustrative references/release-format.md is:
# Release format

## Added
- Describe new user-facing capabilities.

## Changed
- Describe user-facing behavior that changed.

## Fixed
- Describe corrected behavior.

Omit any empty section. Use one concise sentence per item.
Illustrative sample input:
Version: 2.4.0
Merged changes:
- Added CSV export to the reports page
- Changed the dashboard date picker to remember the last range
- Fixed duplicate email notifications after a retry
Call it with:
$release-notes for the version label and merged changes belowIllustrative release-note layout returned:
# 2.4.0

## Added
- Export reports as CSV files.

## Changed
- The dashboard remembers your last selected date range.

## Fixed
- Email notifications are no longer duplicated after a retry.
Codex reads the supplied changes, follows the saved format and returns the release-note document.
Where Codex looks for skills
Location sets the skill's reach. Repository folders travel with the code, user folders work across repositories, and admin or system locations support wider defaults.
Scope | Location | Suggested use |
|---|---|---|
Repository | | Workflows tied to a project or team |
User | | Skills you want in any repository |
Admin | | Shared scripts, automation and defaults for users on the machine |
System | Bundled with Codex | OpenAI skills such as |
Source: OpenAI, Skills page, read 4 November 2026.
Codex follows symlinked skill folders. If 2 skills have the same name, Codex does not merge them. Both can appear in the selector.
Turn a skill off, or share it with your team
You can disable a skill without deleting its folder. Add a matching entry to ~/.codex/config.toml:
[[skills.config]]
path = "/path/to/skill"
enabled = false
If more than 1 entry matches, the last matching entry wins. Restart Codex after changing the configuration. For more settings, see the Codex CLI configuration guide.
In agents/openai.yaml, setting allow_implicit_invocation to false stops automatic selection while keeping explicit $skill calls available. Use $skill-installer to add curated skills beyond the built-ins. Package a reusable skill as a plugin when you want to distribute it, bundle 2 or more skills, or ship it with a connector.
If Codex does not use your skill
Start with the description. If it is vague, move the main use case and trigger words to the front, then try prompts that should and should not select it.
If a new or changed skill does not appear, restart Codex. Codex normally detects changes automatically.
If the folder is present but the skill is disabled, inspect matching [[skills.config]] entries. The last match controls the result.
If explicit calls work but automatic selection does not, inspect allow_implicit_invocation in agents/openai.yaml. A false value leaves $skill working but blocks implicit use.
With many installed skills, the initial list must fit its context budget. Keep descriptions concise, or adjust skills.max_context_tokens within OpenAI's 10,000-token limit.
Get your free AI visibility check
See what the engines say about your company with Xtrusio's free AI visibility check. It shows when ChatGPT and Gemini mention you, which competitors appear instead and what to work on next.
Sources
OpenAI and Xtrusio pages read 4 November 2026.
- Skills, OpenAI
- How to Pick Prompts to Track AI Search, Xtrusio
- Xtrusio home page, Xtrusio
Frequently asked questions
Where do I put a Codex skill?
Use .agents/skills for a repository skill or $HOME/.agents/skills for a skill you want across repositories.
How do I call a skill?
Type $ to mention it or open /skills in Codex CLI or the IDE extension.
Can a skill include scripts?
Yes. OpenAI recommends starting with instructions and adding scripts when you need deterministic behavior or outside tooling.
How do I turn a skill off without deleting it?
Add a matching [[skills.config]] entry with enabled = false to ~/.codex/config.toml, then restart Codex.
Do skills use up context?
The initial skills list uses at most 2% of the context window by default, or 8,000 characters when the window is unknown. Full instructions load only when Codex uses the skill.
Topics
- codex skills

Xtrusio
AI visibility research
Xtrusio is the Perception Engine for B2B brands.
Free check
See how AI engines answer about you
Get your free AI visibility check
Keep reading
 Technical SEO · Nov 4, 2026 · 7 min read
Codex Subagents: How to Set Them Up and Use Them
Learn how Codex subagents work, how to watch their threads, create custom agent files, set limits and fix common setup problems. Technical SEO · Nov 4, 2026 · 6 min read
Claude Code GitHub Actions: Set Up @claude in Your Repo
Set up Claude Code GitHub Actions with /install-github-app or a manual workflow, then test @claude, control costs and fix common failures. Technical SEO · Nov 4, 2026 · 7 min read